Accepting Beldex (BDX) for payments just became much more practical with BTCPay Server’s integration.
BTCPay Server was originally built around Bitcoin and it has expanded over time to support other networks. native BDX support to BTCPay Server, making it possible for merchants, donation platforms, and online communities to accept BDX in a self-hosted, non-custodial way.
As part of this integration, the team will also continue to maintain, develop and create business-facing guides that help merchants easily accept BDX for payments on their platform.
Earlier guides that explored similar integrations for other networks are now deprecated, and they do not reflect the current Beldex implementation accurately.
This guide is written specifically for BDX merchants and is based on the latest release from the Beldex team. It walks you through the setup process step by step, from deployment to accepting payments, so that you can start accepting BDX using BTCPay Server.
The instructions in this guide assume the use of Ubuntu 20.04+ or newer, whether on a local machine or a VPS. That said, most of the steps can be adapted with minimal changes to other widely used Linux distributions.
Recommended Hardware
Pruned Node (the default Beldex node type for BTCPay Server)
- 2+ vCPUs/cores
- 4GB+ RAM
- 100GB+ SSD
- ~25GB are required for the pruned Bitcoin node, and ~50GB for the pruned Beldex node.
Why Use BTCPay Server to Accept Beldex?
There are multiple options to accept Beldex (BDX) for payments, and chief among them is BTCPay Server, which remains one of the best choices for merchants accepting crypto payments worldwide.
This is because BTCPay Server is a free, open-source, self-hosted crypto payment processor that enables merchants to accept crypto payments directly from their customers, with no third-parties, intermediaries, KYC requirements, and processing fees.
Firewall Setup with UFW
Before running BTCPay Server with Beldex, it’s important to secure your server properly. The first step is configuring a firewall so that only the required ports, such as SSH and BTCPay Server, are accessible.
This can be done using UFW (Uncomplicated Firewall), a simple tool for managing firewall rules on Linux. If you are new to UFW, DigitalOcean provides a clear introductory guide to help you get started.
Once installed, you should add rules that allow only the services that you actually need. After confirming the correct ports are permitted, enable the firewall to enforce those restrictions and reduce unnecessary exposure.
# Deny all non-explicitly allowed ports
sudo ufw default deny incoming
sudo ufw default allow outgoing

# Allow SSH access
sudo ufw allow ssh

# Allow HTTP for LetsEncrypt verification
sudo ufw allow http

# Allow HTTPS for the BTCPay Server UI
sudo ufw allow https

# Enable UFW
sudo ufw enable
Get A Domain For Your Instance To run BTCPay Server, you will need a domain that you want to use for the instance
To run BTCPay Server, you will need a domain that you want to use for the instance.
For public-facing stores, this should be a custom domain name so customers can access your checkout page from any browser. Once purchased, create a DNS record that links your chosen subdomain to your VPS or server IP.
For example, we host ours at btcserver.beldex.dev (for testing purposes).
Prepare for installing BTCPay Server
Refer here for the complete official documentation (for technical users): Introduction to BTCPay Server
BTCPay server took this initiative to make this step extremely easy for first-time users with its useful documentation. So all you need to do to get the necessary files for BTCPay Server is as follows:
# Login as root
sudo su -

# Create a folder for BTCPay
mkdir BTCPayServer
cd BTCPayServer

# Clone this repository
git clone https://github.com/btcpayserver/btcpayserver-docker
cd btcpayserver-docker
Configuring BTCPay Server with Beldex Support
Merchants who use BTCPay Server generally accept Bitcoin, therefore this guide will assume that you intend to accept both Bitcoin and Beldex payments.
BTCPay Server is configured using “environment variables,” which define the required options before the installation and initial startup process. These variables ensure the server is deployed with the correct settings from the outset.
Before proceeding, make sure to replace btcpay.Example.com with the domain name you previously configured for your server.
# Run btcpay-setup.sh with the right parameters
# Set the custom domain you chose to use
export BTCPAY_HOST="btcpay.EXAMPLE.com"

# Use Bitcoin on mainnet
export NBITCOIN_NETWORK="mainnet"

# Enable Bitcoin support
export BTCPAYGEN_CRYPTO1="btc"

# Enable Beldex support
export BTCPAYGEN_CRYPTO2="bdx"

# opt-save-storage-xs (opens new window)will keep around 3 months of blocks (prune BTC for 25 GB)
# opt-add-tor enables Tor support for the UI and Bitcoin node
export BTCPAYGEN_ADDITIONAL_FRAGMENTS="opt-save-storage-xs;opt-add-tor"

# Enable automatic HTTPS reverse proxy + SSL certs via Nginx and LetsEncrypt
export BTCPAYGEN_REVERSEPROXY="nginx"

# Allows you to manage the BTCPay Server install from the web UI, update, etc.
export BTCPAY_ENABLE_SSH=true
You can add this command to the above and can also use the lightning network transaction.
export BTCPAYGEN_LIGHTNING="clightning"
However, if your goal is to accept only Beldex, you may use the simplified configuration provided below.
# Run btcpay-setup.sh with the right parameters
# Set the custom domain you chose to use
export BTCPAY_HOST="btcpay.EXAMPLE.com"

# Enable Beldex support
export BTCPAYGEN_CRYPTO1="bdx"

# opt-save-storage-xs (opens new window)will keep around 3 months of blocks (prune BTC for 25 GB)
# opt-add-tor enables Tor support for the UI and Bitcoin node
export BTCPAYGEN_ADDITIONAL_FRAGMENTS="opt-add-tor"

# Enable automatic HTTPS reverse proxy + SSL certs via Nginx and LetsEncrypt
export BTCPAYGEN_REVERSEPROXY="nginx"

# Allows you to manage the BTCPay Server install from the web UI, update, etc.
export BTCPAY_ENABLE_SSH=true
Configuring And Installing Btcpay Server
The next step is to configure and install BTCPay Server. It’s quite a simple process, because the script included with the BTCPay server repo will download and install all of the necessary packages and Docker images that you might need to run the BTCPay Server.
. ./btcpay-setup.sh -i
This will:
- Install Docker
- Install Docker-Compose
- Make sure BTCPay starts at reboot via upstart or systemd
- Setup environment variables to use BTCPay utilities
- Add BTCPay utilities in /usr/bin
- Start BTCPay Server
Assuming that everything worked exactly as intended, you should now be able to navigate to your BTCPay Server at the domain you chose earlier.
Create An Account And A Store
To start, you’ll need to make an account on your new instance. Make sure you use a secure email address and a strong password (ideally through a password manager like Bitwarden ), and then you can create stores, handle wallets, and other things.
Follow the official docs to create an account: Register account – docs.btcpayserver.org
After logging in, you should create a store so that you can handle wallets, invoices, and other things for that store.
Follow the official docs to create your store on BTCPay Server: Create a store -docs.btcpayserver.org
Setup your Bitcoin and Beldex wallets
Configure the Bitcoin wallet of choice
You can skip these steps if you’re only accepting Beldex on your BTCPay Server store.

- Select the “Setup Wallet” option and then select the preferred wallet option to set up a Bitcoin wallet.
Follow the official docs to setup your Bitcoin wallet on BTCPayServer: Wallet Setup – docs.btcpayserver.org
Add the Beldex view-only wallet to BTCPay Server
- To configure the Beldex wallet, go to “Manage Plugin” and search for Beldex.
- Then, select the “Beldex” option, and then click “Install”

- Once you install the plugin, the Beldex Wallet will be added under the Wallets menu. Select it to access wallet setup.

- Install the Beldex Electron or Mobile wallet from https://www.beldex.io/. In this example, we’re using the Beldex Electron Desktop wallet for Windows.
- Use an existing wallet or create a new one based on your preference. Many merchants choose to create a separate wallet for their store to keep business transactions organized and easier to track. Others prefer using their existing wallet for convenience. The choice depends on how you want to manage your payments.

- Once you’ve created your wallet, securely store your recovery seed offline. This is the only way to restore access if needed.
- Next, enter your wallet details into the respective fields:
Copy your Wallet Primary Address from your Beldex wallet.

Paste it into the Wallet Primary Address field in the BTCPay Server Beldex setup page.

Copy your Private View Key from your wallet.

Paste it into the Wallet Private View Key field.

If prompted, enter the appropriate Restore Height (Block Height) to speed up synchronization.
After filling in the details, click Set Wallet Details to complete the view-only wallet setup.
Make sure you’ve checked ‘Enabled.’


Now, you can see that the Wallet RPC available has been set to True. Check the “Enable” box, and hit ‘Save.’ Wait for the Beldex node to sync and you’re all set.

If you ever need to replace the Beldex wallet with another one, you cannot do it through the UI and must run this command:
docker exec -ti btcpayserver_monero_wallet rm /wallet/wallet /wallet/wallet.keys /wallet/password && docker restart btcpayserver_monero_wallet
Once you’ve run that, you can then upload new wallet files as you did during the initial setup.
Using your BTCPay Server instance
The document for using BTCPay Server is great and all apply exactly the same for Beldex as to Bitcoin:
User Guide – docs.btcpayserver.org
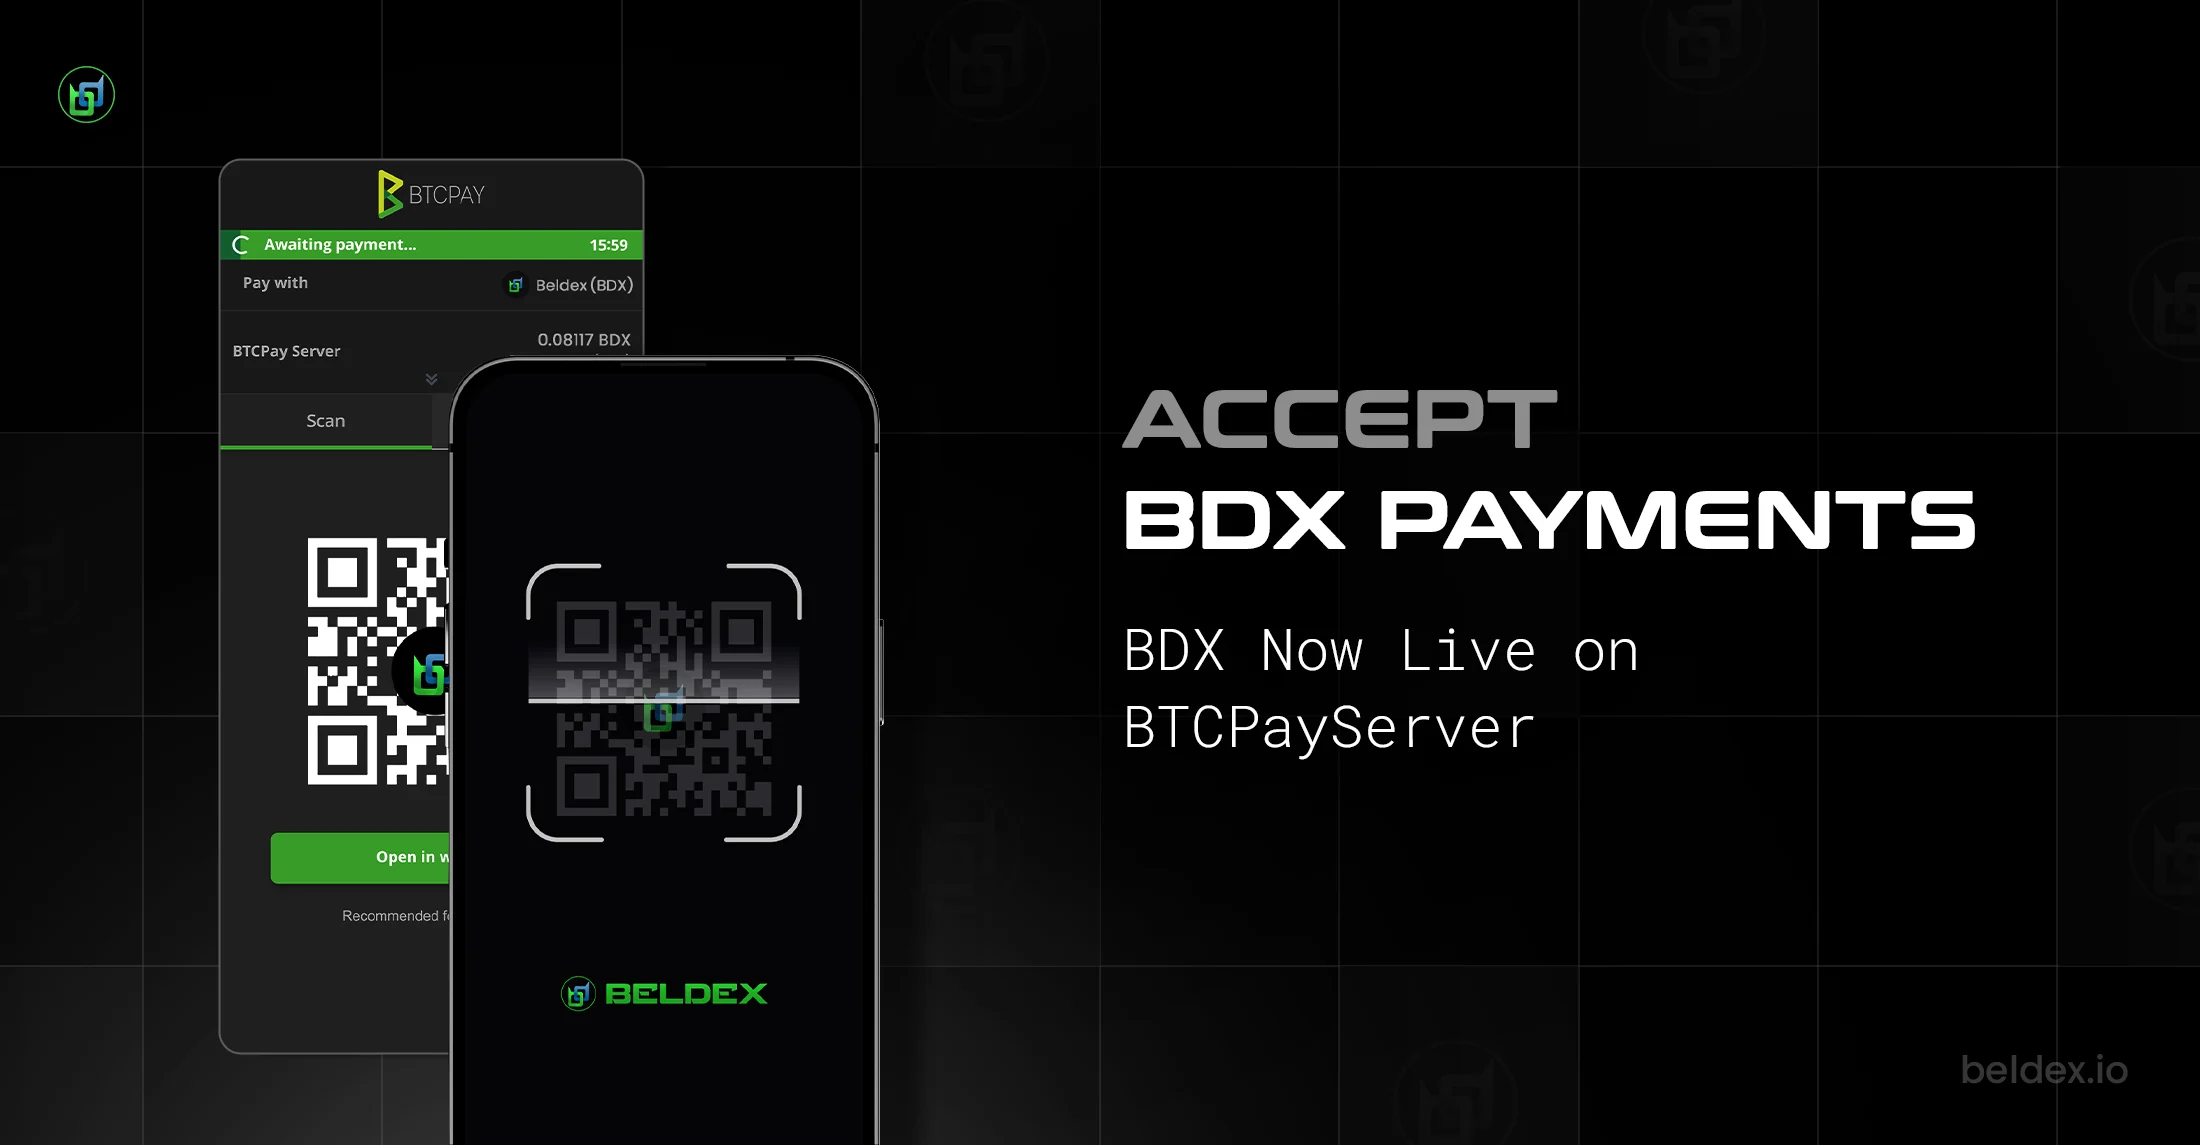
When the user is prompted to pay the invoice, they can now select Beldex (BDX) from the dropdown and pay instantly without any hiccups. An invoice for Beldex looks like the one below.

Contributing to Beldex support in BTCPay Server
If you’re interested in contributing and supporting Beldex within BTCPay Server, there are a few key repositories where meaningful contributions can be made.
The BTCPay Server repository manages the core application logic, including how the front-end interacts with the Beldex node and wallet. This is where most of the integration behavior is handled.
Within btcpayserver-docker, the Beldex.yml file defines how the Beldex-related Docker containers are configured, started, and managed. Adjustments here directly contribute to how Beldex services run alongside BTCPay Server.
Specifically this directory: Beldex
The dockerfile-deps repository, specifically the Bedlex directory, contains the .Dockerfile used to build the Beldex node and wallet images. It also includes the notifier.sh script, which plays an important role by notifying the BTCPay Server process when a Beldex transaction has been received and successfully satisfies an invoice.
There are several areas where improvements would significantly enhance the Beldex experience.
Single Beldex wallet per server
Currently, BTCPay Server supports only a single Beldex wallet per server. This limitation prevents scenarios where multiple stores or users could operate independently on the same hosted instance. Removing this restriction would enable “Uncle Jim” style deployments, where a trusted friend, family member, or community operator hosts BTCPay Server, and others use it for their own stores without managing their own infrastructure.
Replace or remove the Beldex wallet/keys files without a manual deletion via CLI
Another limitation is wallet file management. At present, replacing or removing Beldex wallet and key files requires manual deletion via the command line. Improving this process would make wallet migration, key rotation, or wallet replacement much simpler and less error-prone.
Beldex acceptance relies solely on the Kraken API
Finally, Beldex price conversion currently depends solely on the Kraken
API. Introducing alternative APIs, even as fallback options, would
improve reliability. If Kraken’s API becomes unavailable, shop owners
could continue accepting Beldex without interruption.
Improving these areas would not only enhance usability but also make
Beldex integration within BTCPay Server more resilient, flexible, and
accessible for a broader range of users.
Replacing Beldex view-only wallet files
Occasionally you can run into issues with the Beldex wallet files being corrupted or having incorrect permissions, or you simply want to migrate to a new wallet which unfortunately must be done manually for now.
Delete all current wallet files
NOTE: Be sure you do not need these wallet files before performing this step!
sudo rm /var/lib/docker/volumes/generated_bdx_wallet/_data/*
Upload new wallet files and password file
Place the new wallet files on the host OS file system, and then do the following (replace the first set of filenames if yours do not match):
docker cp btcpay_beldex_view_only btcpayserver_beldex_wallet:/wallet/wallet
docker cp btcpay_beldex_view_only.keys btcpayserver_beldex_wallet:/wallet/wallet.keys
You also need to set the wallet password via a password file:
echo "PASSWORD_HERE" > password
docker cp password btcpayserver_beldex_wallet:/wallet/password
Set permissions on the new wallet files
sudo chmod 666 /var/lib/docker/volumes/generated_bdx_wallet/_data/wallet.keys /var/lib/docker/volumes/generated_bdx_wallet/_data/password
sudo chmod 600 /var/lib/docker/volumes/generated_bdx_wallet/_data/wallet
sudo chown 101:101 /var/lib/docker/volumes/generated_bdx_wallet/_data/wallet
You may also need to restart BTCPay or the Beldex wallet container, but usually it should work without that. If not, you can restart the wallet container with:
docker restart btcpayserver_beldex_wallet
Thanks to every contributor who made the BTCPay server possible and continues to improve it. BTCPay Server, a powerful payment processor having solid Beldex support, is a great initiative towards adapting private payments. More merchants will start using the BTCPay server after accepting Beldex.
The complete BTCPayServer Guide is available here: https://docs.btcpayserver.org/Walkthrough/
For any questions and clarifications, reach out to us on X (formerly twitter), BChat (BNS name: victor-tucci.bdx), or on any of our socials.
Credits: This guide was inspired in part by the documentation created by Seth for Privacy for the Monero community. While the implementation and setup for Beldex slightly differ, his earlier work helped inform the structure and approach taken here.