


The Beldex Wallet Extension brings your BDX wallet directly into your Chrome browser. You can create a new wallet, restore an existing one, manage your funds, send and receive BDX, and connect to supported web applications without installing a separate desktop wallet.
The extension operates as a lightweight wallet, allowing users to access the Beldex network without downloading the entire blockchain history.
Unlike the Beldex Desktop and Mobile Wallets, the extension synchronizes from the block at which a wallet is created or restored. As a result, previously held BDX and earlier transactions will not be displayed immediately when restoring an existing wallet. The extension tracks new transactions from its synchronization starting point and updates the displayed balance accordingly.
Your existing funds remain associated with your wallet, even if they are not reflected in the extension’s displayed balance.
In this guide, we’ll walk you through installing the Beldex Wallet Extension, creating or restoring a wallet, and registering your first Privacy Token on the Beldex testnet.
What Can You Do with the Beldex Wallet Extension?
The Beldex Wallet Extension is designed for everyday users who want to manage their BDX through a browser and developers building applications on the Beldex network.
For Wallet Users
- Create and restore wallets: Set up a new wallet or restore an existing one using your 25-word recovery seed.
- Send and receive BDX: Transfer BDX directly from your browser and receive funds using your wallet address.
- Manage your wallets: Access your wallets and view their available balances and transactions.
- Register masternodes: Access masternode registration and participate in supporting the Beldex network, subject to the applicable requirements.
- Connect to supported applications: Use the extension to connect your wallet to compatible applications built on Beldex. You can also check which applications your wallet is connected to.
For Developers
- Register Privacy Tokens: Create your own Privacy Tokens on the Beldex testnet by specifying the token name, ticker, decimals, and supply.
- Test token functionality: Experiment with Privacy Token registration and transactions using testnet BDX, which has no monetary value.
- Build on Beldex: Use the wallet extension alongside the Beldex Web3JS SDK to develop and test privacy-focused applications.
How to Create a New Beldex Wallet
Step 1: Install the Beldex Wallet Extension
Open the Beldex Wallet Extension on the Chrome Web Store.
Click Add to Chrome and confirm the installation by selecting Add extension when prompted.
Once installed, open the extension to begin setting up your wallet.
Step 2: Choose an Option
When you open the extension for the first time, you’ll see two options:
- Create New Wallet: Set up a wallet for the first time.
- Restore from Seed: Recover an existing Beldex wallet using its recovery seed.
Select Create New Wallet to continue.
Step 3: Save Your Recovery Seed
The extension will generate a unique 25-word recovery seed.
This recovery seed is essential for recovering your wallet if you lose access to your browser, device, or wallet installation.
Write down all 25 words in the exact order displayed and store them securely.
Important: Never share your recovery seed with anyone. Avoid storing it in screenshots, emails, cloud notes, or other locations that could expose it to unauthorized access.
Step 4: Set Up Your Wallet
After saving your recovery seed:
- Enter a name for your wallet.
- Create a strong password.
- Re-enter the password to confirm it.
- Click I Saved My Seed — Continue.
Make sure you have securely recorded your recovery seed before proceeding.
Step 5: Verify Your Recovery Seed
The extension will ask you to confirm specific words from your recovery seed.
For example, you may be asked to identify the first or seventeenth word.
Select the correct word for each requested position from the options provided.
Once all the required words have been selected correctly, click Confirm.
Step 6: Start Using Your Wallet
Your new wallet will begin synchronizing with the Beldex network.
Once synchronization is complete, you can access your wallet, receive BDX, send available funds, and interact with supported applications.
How to Restore an Existing Beldex Wallet
If you already have a Beldex wallet, you can restore it using your 25-word recovery seed.
Step 1: Select Restore from Seed
Open the Beldex Wallet Extension and select Restore from Seed.
Before proceeding, the extension will display a notice explaining how its lightweight synchronization mechanism works.
Note: When restoring an existing wallet, the extension initially displays a zero balance and does not retrieve earlier transaction history. It begins tracking transactions from the restoration block onward. Previously held funds remain associated with the wallet but may not be immediately accessible through the extension.
Step 2: Enter Your Wallet Details
To restore your wallet:
- Enter your existing 25-word recovery seed in the designated field.
- Enter a name for your wallet.
- Create a strong password.
- Re-enter the password to confirm it.
- Click Restore.
Ensure that your recovery seed is entered in the correct order.
Step 3: Access Your Restored Wallet
Once the restoration process is complete, the extension will begin synchronizing from the restoration block.
Your wallet will start tracking new transactions from that point onward. As new transactions are processed, the displayed balance will update based on the funds detected by the extension.
Your existing funds remain associated with the wallet, even if the extension does not display the complete balance. To check your complete balance, restore it on the Beldex mobile or Electron desktop wallet.
How to Deploy Your First Privacy Token on the Beldex Testnet
Beldex Privacy Tokens allow developers and projects to issue their own privacy-preserving assets on the Beldex network.
With the Privacy Token standard available on the Beldex testnet, developers can register tokens, configure their supply, and experiment with token functionality before mainnet deployment.
To get started, you’ll need the Beldex Wallet Extension and 200 testnet BDX.
Understanding Privacy Token Registration Requirements
Registering a Privacy Token on the Beldex testnet requires 200 testnet BDX, distributed as follows:
- 100 BDX: Locked as collateral for approximately six months, after which it is automatically unlocked. (~518,400 blocks approx.)
- 50 BDX: Permanently burned.
- 50 BDX: Transferred to the Beldex governance wallet.
The collateral is automatically unlocked once the required block height is reached.
These requirements apply exclusively to the Beldex testnet. Mainnet registration fees and collateral requirements will be determined separately once the feature becomes available on the mainnet.
Testnet BDX has no monetary value, and no mainnet BDX is required for testnet Privacy Token registration.
Step 1: Switch to Testnet
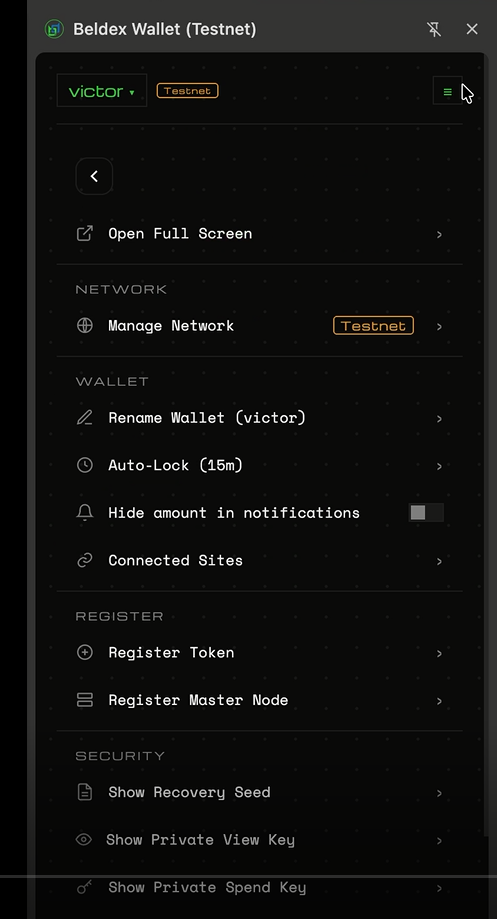
Open the Beldex Wallet Extension and click the menu icon in the top-right corner.
Navigate to Manage Network and select Testnet.
Once selected, the wallet will display a Testnet badge, indicating that you are connected to the test network.
Step 2: Connect to the Beldex Testnet
Visit the Beldex Testnet and connect your Beldex Wallet Extension.
Make sure your wallet is connected to the testnet and contains at least 200 testnet BDX.
If you need testnet BDX, visit the Beldex Testnet Faucet to obtain tokens for testing, subject to the faucet’s availability and distribution limits.
Step 3: Register Your Privacy Token
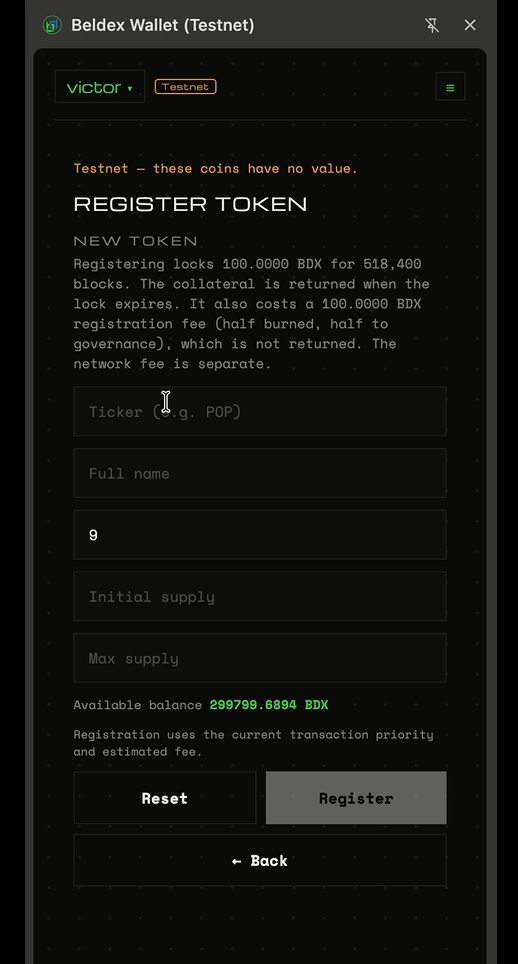
Open the extension menu and navigate to Register → Register Token.
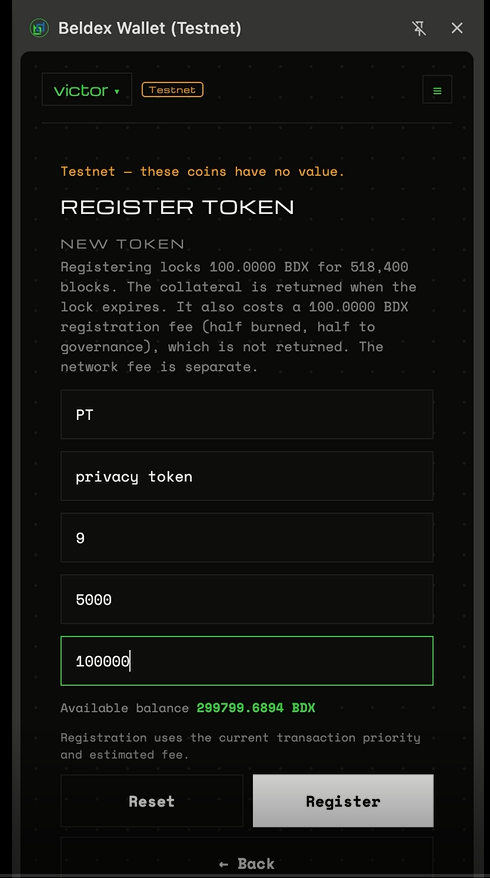
Enter the required token details.
For example:
| S.No | Field | Example |
|---|---|---|
| 1 | Token Ticker | PT |
| 2 | Token Name | Privacy Token |
| 3 | Decimals | 9 |
| 4 | Initial Supply | 5,000 |
| 5 | Maximum Supply | 100,000 |
These values are examples. You can choose the token name, ticker, decimals, and supply based on your project’s requirements.
Once the details are entered, click Register on the extension wallet.
Step 4: Review and Confirm Registration
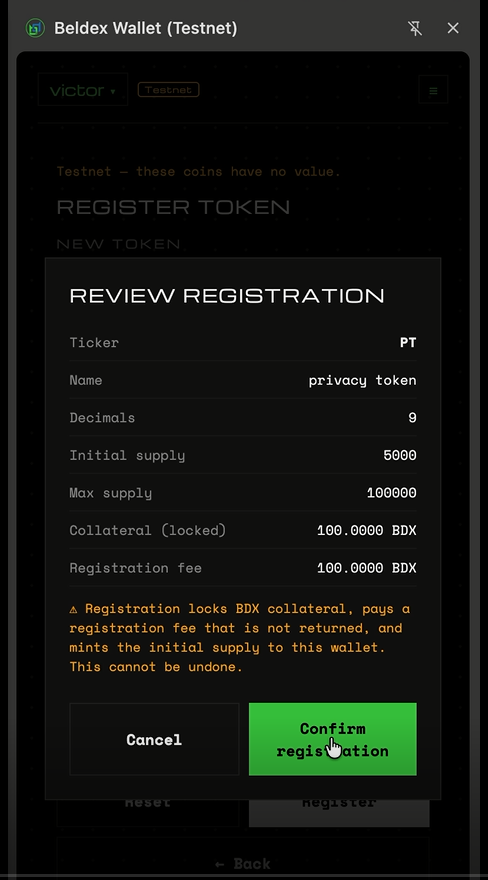
The extension will display a Review Registration screen with your token details.
Carefully verify the token name, ticker, decimals, and supply before proceeding.
Remember that registration requires 200 testnet BDX, including the collateral, burn amount, and governance wallet fee.
Once you’re satisfied with the details, click Confirm Registration.
After successful registration, the initial token supply will be minted to your wallet.
Step 5: Save Your Privacy Token ID
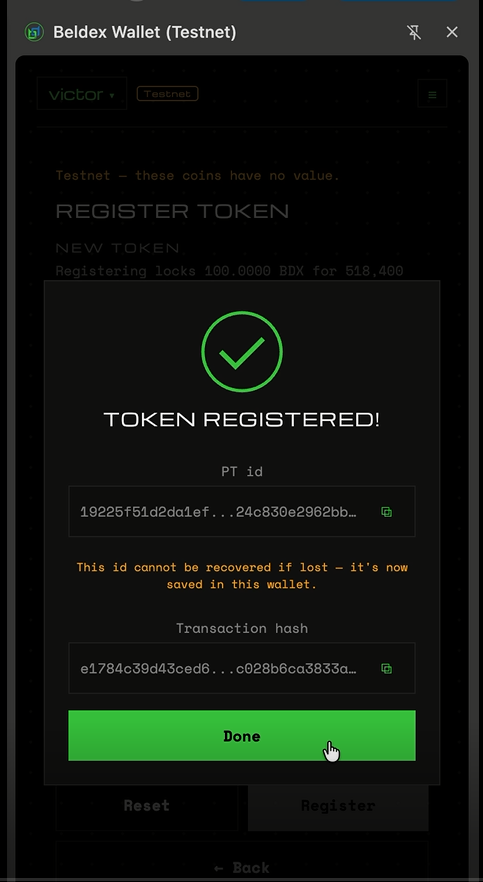
Once registration is successful, the extension will display a Token Registered confirmation screen.
This screen includes your Privacy Token ID (PT ID) and transaction hash.
Important: Copy and securely save your PT ID and transaction hash immediately. The PT ID may not be displayed again in the extension after registration, so it’s important to keep a separate record for future reference.
Click Done to complete the registration process.
Step 6: View Your Registered Privacy Token
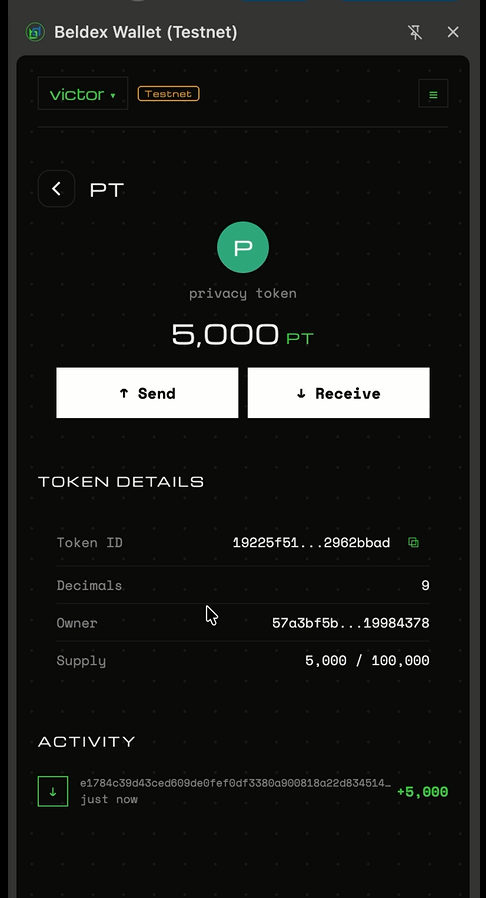
Open the Tokens section of your wallet.
Your newly registered Privacy Token will appear in the list. It may initially display a pending mint status while the registration transaction is being processed.
Once minting is complete, you can view your token balance and available details, including its token ID, decimals, owner, and supply.
You’ve now registered your first Privacy Token on the Beldex testnet.
Ready to Get Started with the Beldex Wallet Extension?
The Beldex Wallet Extension provides a browser-based way to access the Beldex network, manage BDX, register masternodes, and connect with supported applications.
For developers, it also serves as a gateway to building with Privacy Tokens on the Beldex testnet, allowing projects to experiment with privacy-preserving assets using the network’s developer infrastructure.
Whether you’re creating your first wallet, restoring an existing one, or registering your first Privacy Token, the extension makes these capabilities accessible directly from Chrome.
Get started:
 Listen

 back to blog